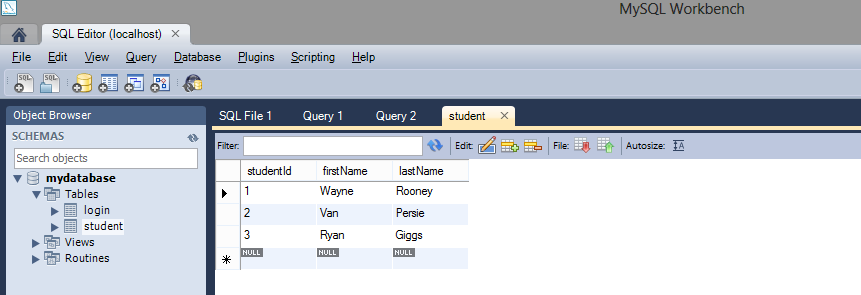
Sunday 3 August 2014

Get OS Architecture in Java


Recently I came across a situation where I had to find the OS architecture and the JRE architecture i.e. I had to determine if my Windows had a 32 or 64 bit architecture and if my JRE was 32 or 64 bit from a JAVA program.


Soon I realised that "os.arch"  system property will only give you the architecture of the JRE, not of the underlying OS. It means, if you install a 32 bit JRE on a 64 bit system, System.getProperty("os.arch") will return  x86.

So I had to find another way to get the OS architecture. I came up with a simple JAVA program that uses the command line string "wmic OS get OSArchitecture" to get the underlying OS Architecture.

The following program will retrieve all the required parameters:

Monday 3 February 2014

CRUD Application in Netbeans using EJB and JPA with MySQL


This tutorial demonstrates how to make an EJB application in Netbeans using JPA and the database as MYSQL.
This is an example of using CRUD (create, retrieve, update and delete) operations using JPA and MySQL database that follows the MVC architecture. It includes a login page which allows only registered users to login and a home page which has the CRUD features to add, edit, delete and search students from the database.

Before we start with the application we need the following:

Step 1: Create a database called 'mydatabase' using the MySQL workbench and create two tables called 'login' (which will store the usernames and passwords of users who can log in) and 'student' (which will store the details of students) and insert some data into the tables.

Login table


Student table


Step 2: Create a new Java Web Application project  and give any name such as 'MyEJBApplication' and select the server as 'Glassfish' (Mostly everything would be present by default)


Step 3: Create a JDBC Connection Pool (Right click on Project name -> New -> Other -> Glassfish(folder) -> JDBC Connection Pool) 


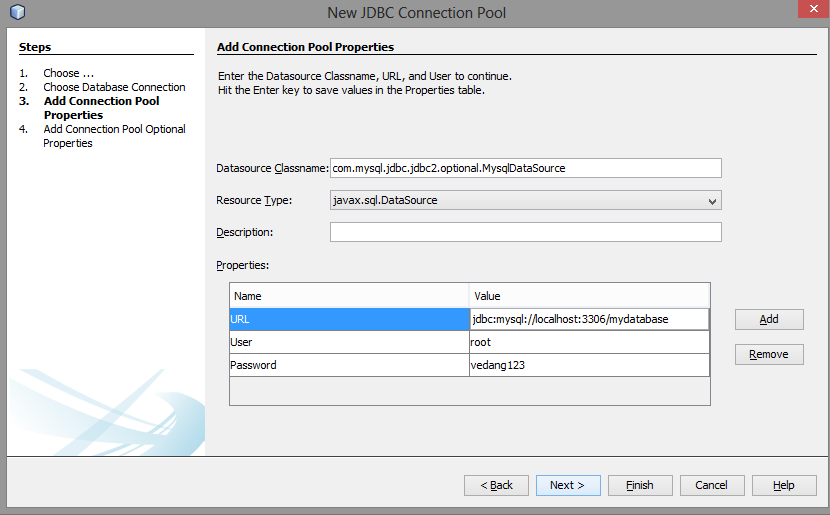
Step 4: Select MySQL from the dropdown box as shown below. ( Note the name of the connection pool) - in this case it is 'connectionPool')


Step 5: Provide the host, port (within the URL parameter), username and password of your mysql database as shown below:


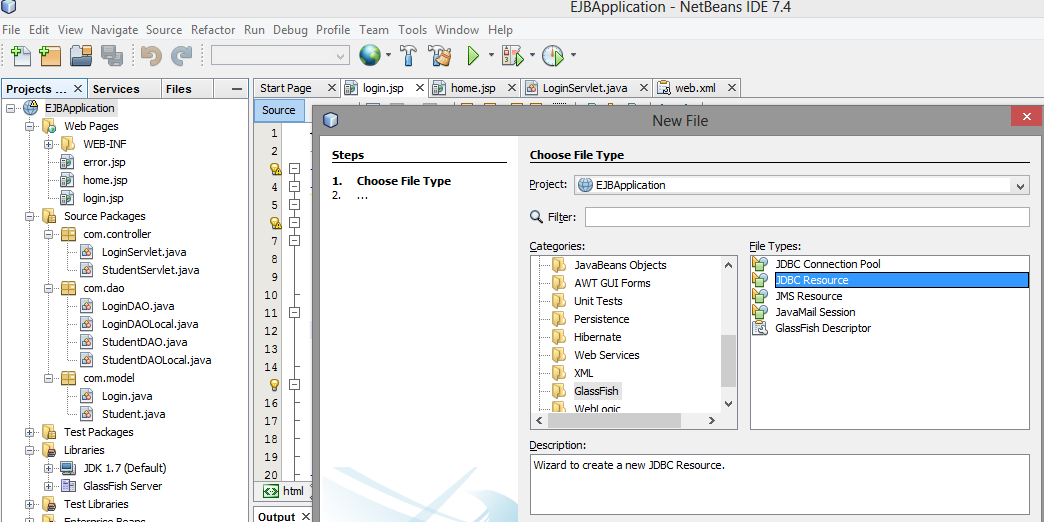
Step 6: Create a JDBC Resource (Right click on Project name -> New -> Other -> Glassfish(folder) -> JDBC Resource).


Step 7: Select the JDBC connection pool name you just in created above (step 4) from the drop down box. Provide a JNDI name as shown:


Step 8: Create a Persistence Unit (Right click on Project name -> New -> Other -> Persistence -> Persistence Unit).


Step 9:  Provide a name to the Persistence Unit and select the data source name which you gave while creating the JDBC Resource above (step 7). (Note that the table generation strategy is set to 'None')


Step 10: Create 3 JSP Pages namely home.jsp, login.jsp and error.jsp and insert the following codes respectively

home.jsp


login.jsp


error.jsp


Step 11: Create 3 packages as follows:

Step 11.1: First package com.model and create 2 Entity beans namely 'Login' and 'Student' and insert the following codes respectively.

com.model.Login.java


com.model.Student.java


Step 11.2: Second package com.dao that contains the Session Beans (create by right click on project name -> New -> Session Bean) namely 'LoginDAO' and 'StudentDAO'. ( Both these session beans implement methods from a local interface. Select the 'Local Interface'option while creating the session beans. The LoginDAOLocal and StudentDAOLocal will be automatically created). Add the following respective codes to the session beans and their interfaces appropriately. 

com.dao.LoginDAO


com.dao.LoginDAOLocal


com.dao.StudentDAO


com.dao.StudentDAOLocal


Step 11.3: Third package com.controller that contains the servlets namely 'LoginServlet' and 'StudentServlet' and add the following codes respectively.

com.controller.LoginServlet

com.controller.StudentServlet


Step 12: Check your configuration files(web.xml, persistence.xml and glassfish-resources.xml). They should be as follows:

web.xml

persistence.xml

glassfish-resources.xml


Step 13: The final directory structure of the entire project should look as follows:


Step 14: Run the application by Right click on the project name -> Run

14.a: You should see login.jsp. Provide the username as 'admin' and password as 'admin' (as given in the login table in mydatabase) and click on Login.


14.b: You can now add, edit, delete or search for student records from the student table.


Notes:
  • The Java Persistence API (JPA) is one possible approach to ORM. JPA is a specification and several implementations are available. Popular implementations are Hibernate, EclipseLink and Apache OpenJPA. (You can check the implementation while creating the persistence.xml configuration file. In this case or by default in netbeans its EclipseLink).
  • The Entity beans represent the data in the database. Each instance of an entity bean corresponds to a row in the table. Session beans contain the actual business logic methods.


Tuesday 21 January 2014

Basic Hibernate Application in Eclipse


This tutorial demonstrates how to use Hibernate which is an Object relational mapping tool for Java platform.
This is a simple example of creating an object in Java and mapping it to a table in mysql database. (inserting rows into the mysql database using Hibernate)


Before we start with the application we need the following:

Step 1: Create a Java project in Eclipse.


Step 2: Provide a name for your project and click on ‘Finish’


Step 3: Add the following jars (which are present in the downloaded hibernate x.x -> lib -> required folder)  and also the downloaded mysql odbc jar file to the project by right clicking on the project name followed by Properties ->Java Build Path -> Libraries -> Add External jars


Step 4: Create the hibernate.cfg.xml file in the src folder of the project and copy the following code into the xml file:


Step 5: Update the hibernate.cfg.xml file parameters ( port number, database name, username password). The final hibernate.cfg.xml should look as follows:


Step 6: Create a package ‘com.model’ and create two classes named ‘Employee’ and ‘HibernateMain’ within that package and paste the following codes in the respective class files:

Employee.java


Hibernate.java


Step 7 : Your final directory structure should look as follows:


Step 8: Run the HibernateMain.java as a Java Application.  The console should show your insert queries as follows:


If you open mysql and check the database, the two employee rows should be present.


Notes:
  • The Annotations in the Employee.java file help Hibernate decide the structure of the table to be created in the database. For example, @Entity tells Hibernate to treat this object as a table in the database. @Id annotation just above the declaration of parameter eid in the Employee.java file tells Hibernate to treat eid as the primary key of the table. @Table (name="employee") decides the name of the table which will be created in the database. 
  • For every new model class for which we need to create a table we need to give the @Entity annotation in the class file itself and add the mapping parameter in the hibernate.cfg.xml file as <mapping class="com.model.class_name"/>
  • The <property name="hibernate.hbm2ddl.auto">create</property>
    which is set to create in our example automatically creates a schema destroying the previous data
    The list of possible values for this parameter are,
    1. validate: validate the schema, makes no changes to the database.
    2. update: update the schema.
    3. create: creates the schema, destroying previous data.
    4. create-drop: drop the schema at the end of the session.


Wednesday 8 January 2014

Vegetable Fried Rice: Recipe


Preparation Time: 30 min

Main Ingredients:
  1. 2 cups of rice.
  2. 2 spring onions finely chopped.
  3. 2 carrots finely chopped
  4. 100 gms of cabbage finely chopped.
  5. Lemon
  6. Garlic paste
  7. Soya sauce
  8. Green Chillies chopped (3-4 pieces)
  9. Tomato sauce, maggi masala cubes (optional).
Steps:
  1. Prepare a mixture of rice, salt, oil, 1/2 tbsp soya sauce and half lemon juice.
  2. Cook the mixture in a pressure cooker. (Take care not to overcook the rice).
  3. Heat oil in another pan and add the garlic paste and chillies to it.
  4. Fry it for 2 minutes.
  5. Add all the chopped vegetables except spring onion (because spring onion takes very less time to cook).
  6. Add 1/2 tbsp soya sauce, tomato sauce, maggi masala cube and salt to the vegetable mixture (Take care while adding salt as we have already added some salt in the rice mixture).
  7.  Keep the gas low and let the mixture cook for some time.
  8. Once the vegetables are cooked nicely, add the rice mixture.
  9. Stir well.
  10. Let the mixture cook for 2-3 minutes and serve hot.

Friday 3 January 2014

Basic Struts2 Application in Eclipse

This tutorial demonstrates how to create a basic Struts 2 Application in Eclipse using Tomcat 7.0 server (A simple login application).

Before we start with the application we need the following:


Step 1: Create a dynamic web project in Eclipse.


Step 2: Enter the project name and make sure the target runtime is set to the downloaded Apache tomcat server as shown in the below picture and click on Next. If it’s set to ‘None’, Click on ‘New Runtime’ tab and select the downloaded Apache version from the list.

Step 3: Click again on next and make sure ‘Generate web.xml deployment descriptor’ field is checked on the last page before you click on finish.


Step 4: Add the following struts2 jars (present in the downloaded struts2 -> lib folder) in the
 WebContent -> WEB-INF -> lib location of the project.


Step 5: Edit the web.xml file ( WebContent -> WEB-INF -> lib) and the following code just after the  </welcome-file-list> end tag as follows:


The new web.xml should look as follows:


Step 6: Create struts.xml file in the Java Resources -> src folder of the project and copy the following code into struts.xml:


Step 7: Create a package ‘com.action’ and create a class named ‘TutorialAction’ within that package and paste the following code in the class file:


Step 8: Create 3 JSP files in Webcontent folder namely index.jsp, output.jsp and error.jsp and paste the following codes into the respective JSP files.


index.jsp

output.jsp

error.jsp

Step 9: The final directory structure should look as follows:


Step 10: Run the application by right clicking on the ‘MyFirstStruts2App’ and click on ‘Run on Server’. If you see the following screen everything went right. (In case you get some error check all the steps again if you have missed anything).


Enter the username as ‘admin’ and password as ‘admin123’ and click on Submit. You would get the welcome screen of output.jsp


Test your application by entering a wrong username or password and click on Submit. You would get the error screen of error.jsp


Notes:
  •    The index.jsp is created as the first page because it’s already present by default in the web.xml file. If you want to add a new file as the first page (e.g. home.jsp), add the appropriate file name in the <welcome-file-list> tag of web.xml
  •    Make sure you have all the jar files in the proper location. (In case you get an error of NoClassDefFoundError, it’s probably because of a missing jar file).
  • The username and password can be changed by modifying the execute method of the TutorialAction class.
  • By default the execute method is invoked whenever the action class is called and this method should always return a String which is mapped in the struts.xml. If you need to call your own method modify the struts.xml by adding a method attribute with the method name as the value in the action tag as follows:  
  •  The main entry point to the Struts2  part of the application is the filter tag part of the web.xml
  • The line <%@ taglib prefix="s" uri="/struts-tags" %> in the output.jsp and index.jsp is used to enable struts tags.