This tutorial demonstrates how to make an EJB application in Netbeans using JPA and the database as MYSQL.
This is an example of using CRUD (create, retrieve, update and delete) operations using JPA and MySQL database that follows the MVC architecture. It includes a login page which allows only registered users to login and a home page which has the CRUD features to add, edit, delete and search students from the database.
Before we start with the application we need the following:
- Netbeans IDE. Click here to download
- MySQL database
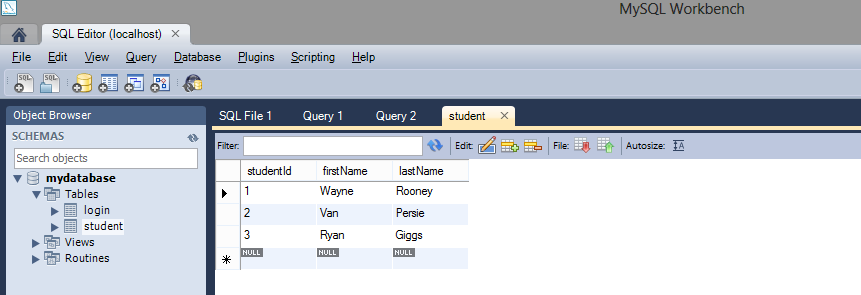
Step 1: Create a database called 'mydatabase' using the MySQL workbench and create two tables called 'login' (which will store the usernames and passwords of users who can log in) and 'student' (which will store the details of students) and insert some data into the tables.
Login table

Student table
Step 2: Create a new Java Web Application project and give any name such as 'MyEJBApplication' and select the server as 'Glassfish' (Mostly everything would be present by default)

Step 3: Create a JDBC Connection Pool (Right click on Project name -> New -> Other -> Glassfish(folder) -> JDBC Connection Pool)

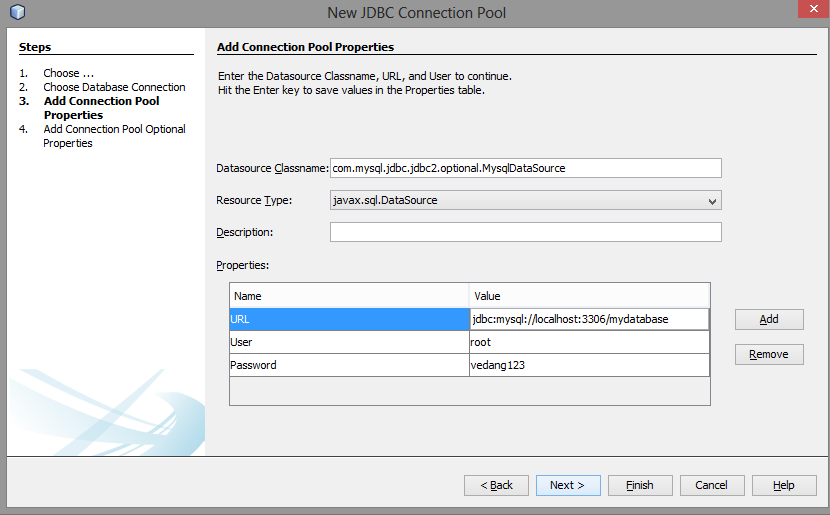
Step 4: Select MySQL from the dropdown box as shown below. ( Note the name of the connection pool) - in this case it is 'connectionPool')

Step 5: Provide the host, port (within the URL parameter), username and password of your mysql database as shown below:
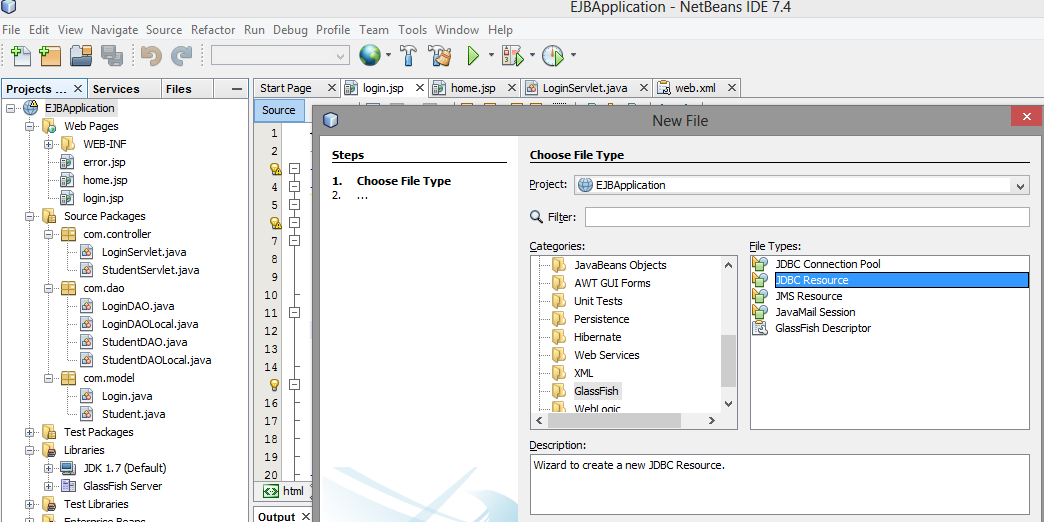
Step 6: Create a JDBC Resource (Right click on Project name -> New -> Other -> Glassfish(folder) -> JDBC Resource).
Step 7: Select the JDBC connection pool name you just in created above (step 4) from the drop down box. Provide a JNDI name as shown:

Step 8: Create a Persistence Unit (Right click on Project name -> New -> Other -> Persistence -> Persistence Unit).

Step 9: Provide a name to the Persistence Unit and select the data source name which you gave while creating the JDBC Resource above (step 7). (Note that the table generation strategy is set to 'None')

Step 10: Create 3 JSP Pages namely home.jsp, login.jsp and error.jsp and insert the following codes respectively
home.jsp
login.jsp
error.jsp
Step 11: Create 3 packages as follows:
Step 11.1: First package com.model and create 2 Entity beans namely 'Login' and 'Student' and insert the following codes respectively.
com.model.Login.java
com.model.Student.java
Step 11.2: Second package com.dao that contains the Session Beans (create by right click on project name -> New -> Session Bean) namely 'LoginDAO' and 'StudentDAO'. ( Both these session beans implement methods from a local interface. Select the 'Local Interface'option while creating the session beans. The LoginDAOLocal and StudentDAOLocal will be automatically created). Add the following respective codes to the session beans and their interfaces appropriately.
com.dao.LoginDAO
com.dao.LoginDAOLocal
com.dao.StudentDAO
com.dao.StudentDAOLocal
Step 11.3: Third package com.controller that contains the servlets namely 'LoginServlet' and 'StudentServlet' and add the following codes respectively.
com.controller.StudentServlet
Step 12: Check your configuration files(web.xml, persistence.xml and glassfish-resources.xml). They should be as follows:
web.xml
persistence.xml
glassfish-resources.xml
Step 13: The final directory structure of the entire project should look as follows:

Step 14: Run the application by Right click on the project name -> Run
14.a: You should see login.jsp. Provide the username as 'admin' and password as 'admin' (as given in the login table in mydatabase) and click on Login.


Notes:
- The Java Persistence API (JPA) is one possible approach to ORM. JPA is a specification and several implementations are available. Popular implementations are Hibernate, EclipseLink and Apache OpenJPA. (You can check the implementation while creating the persistence.xml configuration file. In this case or by default in netbeans its EclipseLink).
- The Entity beans represent the data in the database. Each instance of an entity bean corresponds to a row in the table. Session beans contain the actual business logic methods.
Thanks for this article :)
ReplyDeletey tế sức khỏe và đời sống -- Máy đo đường huyết giá rẻ
Glad you found it helpful.
DeleteThanks bro
ReplyDeletehello, i have that problem:
ReplyDeleteIn-place deployment at C:\Users\Camue\Documents\NetBeansProjects\MyEJBApplication\build\web
GlassFish Server 4.1, deploy, null, false
C:\Users\Camue\Documents\NetBeansProjects\MyEJBApplication\nbproject\build-impl.xml:1045: The module has not been deployed.
See the server log for details.
BUILD FAILED (total time: 6 seconds)
please help
In this case just check the glassfish server log for the exact error. The log is located at
Delete{Your_GlassFish_Location}\glassfish\domains\domain1\logs\server.log
Just a guess - The reason could be a missing jar file.
Where can download this entire project?
ReplyDeletePlease could make available for download?
thank you
Could you please send a project for me??
ReplyDeletefer.elias1@gmail.com
hello I need Your help please ! Ihave this error :
ReplyDeleteStarting GlassFish Server 4.1.1
GlassFish Server 4.1.1 is running.
In-place deployment at C:\Users\user\Desktop\khadidja\AKHER_AMAL\AKHER_AMAL-war\build\web
GlassFish Server 4.1.1, deploy, null, false
C:\Users\user\Desktop\khadidja\AKHER_AMAL\AKHER_AMAL-war\nbproject\build-impl.xml:1076: The module has not been deployed.
See the server log for details.
BUILD FAILED (total time: 1 minute 20 seconds)
thanks bro. But after entering username an password to login I get an error which says "The server encountered an internal error that prevented it from fulfilling this request." what do I do?
ReplyDeletethe same error like me, how to solve this problem?
DeleteDo you have full source code on github ?
ReplyDelete